Here's All The Concept Art From The Book Of Boba Fett Episode 4

This article contains spoilers for the latest episode of "The Book of Boba Fett."
Last week, we hit the official midway point for the inaugural season of "The Book of Boba Fett." Episode 4, "The Gathering Storm," lives up to its title as a table-setter that does the important work of looking ahead to the final two climactic episodes and putting the pieces into place for what's to come. But that doesn't make this episode nothing more than "filler" or wheel-spinning. Far from it, as we once again spend a significant amount of time reliving Boba Fett's (Temuera Morrison's) flashbacks to his life after escaping from the Sarlacc pit. On this occasion, we find out exactly how he and Fennec Shand (Ming-Na Wen) cross paths — it's not much more enlightening than from what we could piece together while watching "The Mandalorian," in all honesty — and see their very first mission together, which involves breaking Boba's old "Firespray" gunship (which appears to be in-universe confirmation of its new canonical name) out from under Bib Fortuna's watchful eye.
In the present-day storyline (which actually takes place decades before the actual present-day of the sequel trilogy, but work with me here!), Boba continues the hard work of forging alliances, preparing for all-out war against the Pyke Syndicate, and, of course, taking those healing baths in the bacta tank. Sadly, those baths seem to have come to an end now that he's fully healed, but all good things must come to an end sooner or later. In any case, all of that and more are now immortalized in the usual batch of eye-popping concept art included at the end of every episode, a tradition that started with "The Mandalorian" and has continued here. Check them all out below!
Filling in the Blanks
As fans know, both Fennec Shand and Boba Fett made appearances on "The Mandalorian" before moving on to their own spin-off series. Though they quickly join forces throughout the second season, plenty of gaps remained that "The Book of Boba Fett" finally saw fit to begin filling in this episode. Now told from Boba Fett's perspective, we revisit the scene where Fennec is left for dead after her less-than-successful run-in with Pedro Pascal's Din Djarin (as told in the fifth episode, "The Gunslinger") and immediately pick up on the events from there. Mortally wounded, Boba takes her to a mod shop on the outskirts of Mos Eisley and nurses her back to health, earning her loyalty.
 Lucasfilm
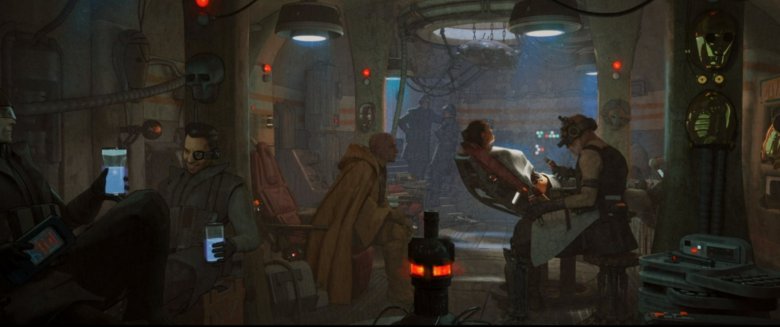
Starting to see why all that hubbub last week over the biker gang of mods was rather silly? Though we don't come back to the exact same gang in this episode, their influence extends to saving the life of Fennec Shand. And a familiar face even cameos as the mod character who puts Fennec's body back together! That's right, the cyberpunk "doctor" who saves her life is none other than Stephen "Thundercat" Bruner, the bassist, singer, and songwriter made famous for his appearances in the band "Suicidal Tendencies." Didn't expect that piece of trivia in your "Star Wars" show, did you? The character in this concept art doesn't bear his likeness, but it's a fun little surprise nonetheless. That's not the only difference, however, as the art also shows some creepy wall decorations in the form of droid heads mounted on the wall like trophies. The "Blade Runner" influences in the scene are already apparent, but clearly the creative team held back just a bit when translating the art into live-action.
 Lucasfilm
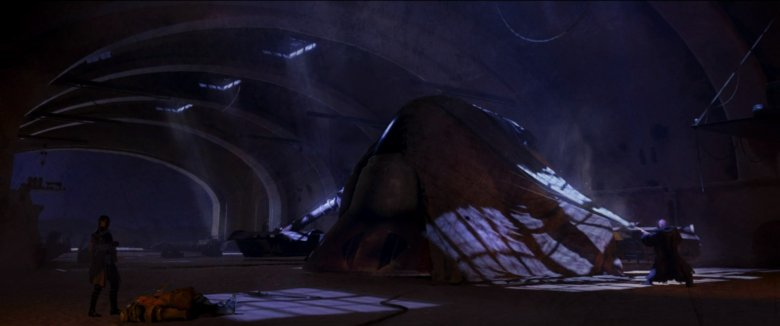
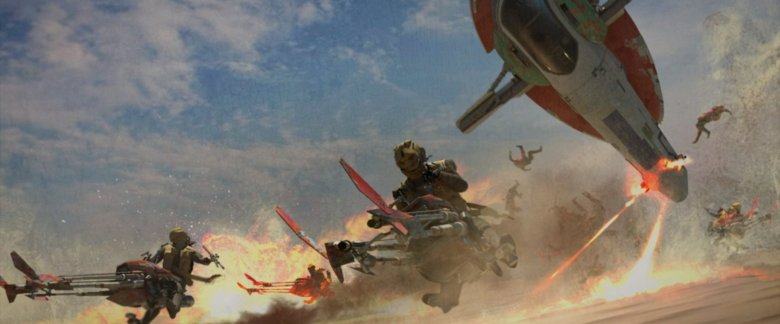
So once Fennec Shand is back on the mend, the first order of business is, obviously, revenge. Boba and Fennec aren't exactly in the best of shape to actually take on Bib Fortuna and claim his throne just yet, but they can covertly sneak into his palace and make off with Boba's old gunship. This caper provides the centerpiece of the episode's action, providing a much-needed dose of liveliness after a relatively quiet last few episodes. Intriguingly, this art implies that the fight was much less of a challenge at one point, at least based on the smaller body count. Unfortunately, nothing's ever easy for Boba.
The Bounty Hunter Strikes Back
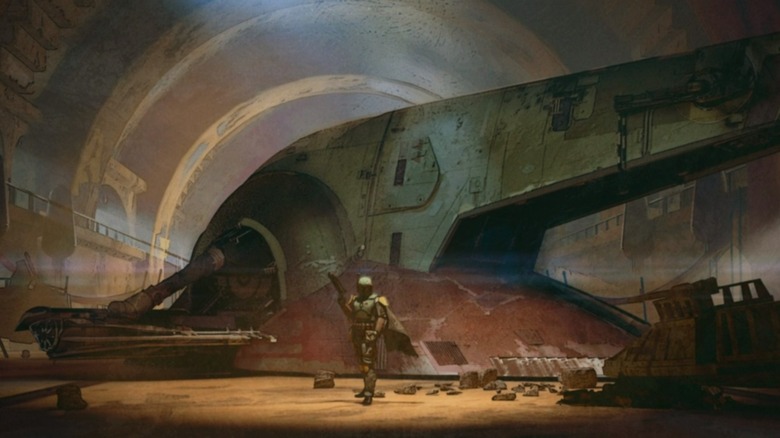
Reunited and it feels so good. This particular piece of artwork depicts Boba Fett in full armor, standing in front of his Firespray gunship. Obviously, those who watched the episode know that Boba hadn't yet retrieved his classic armor at this point, having only done so during the events of the last season of "The Mandalorian." Either this artwork was actually commissioned quite some time ago, before creator Jon Favreau had fully settled on the exact timeline of events ... or, and this is my personal suspicion, the temptation to draw such iconic iconography as the (former) bounty hunter in all his glory in front of his fan-favorite and wonderfully-designed ship was simply too much to resist. Either way, it's a striking and gorgeous piece of imagery, even if it's not fully accurate compared to what takes place in the actual episode.
 Lucasfilm
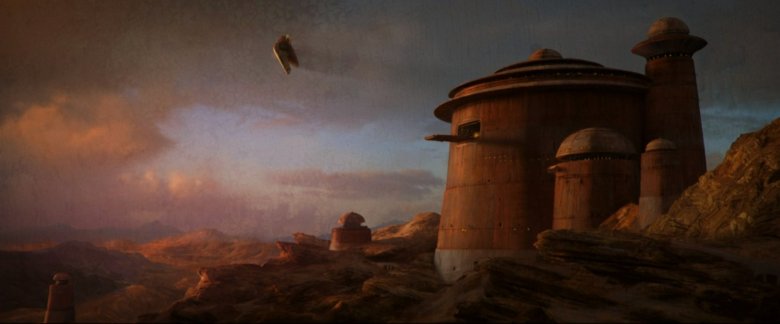
I love concept art that looks painterly enough to hang up on a wall, and this one certainly fits the bill. After successfully infiltrating Jabba the Hutt's Bib Fortuna's palace, Boba and Fennec flee the scene of the crime (although, does it technically count as stealing if it belonged to him in the first place?) and head out on the next step of his revenge tour. Jabba's former palace was first brought to life in the original trilogy as an actual matte painting, so it only feels fitting to see that proud tradition continue here, even if it's just concept art. Seeing George Lucas' and Ralph McQuarrie's legendary vision, brought to life in all their glory, will never get old for me.
 Lucasfilm
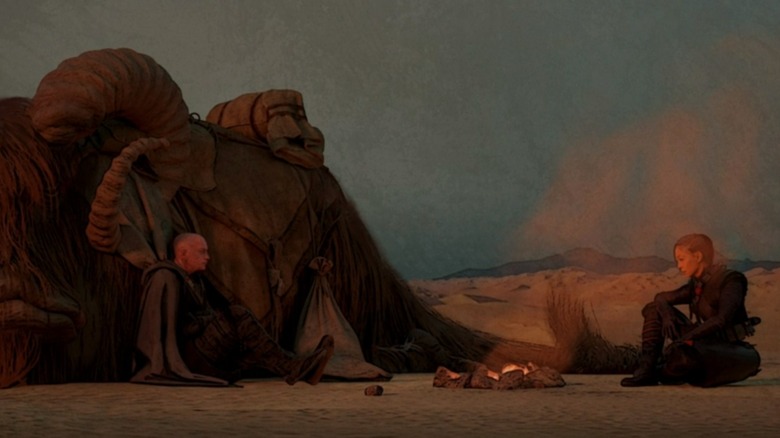
Boba Fett: 1, Nikto sand riders: 0. Fennec casually mentions that it's hard to believe a little ol' gang could possibly massacre a Tusken raider camp, and we're inclined to agree ... especially given how Boba Fett makes quick work of them from the safety of his gunship. The violent encounter feels much more in line with the Boba Fett we knew of from the original trilogy and a stark comparison to the more honorable and less bloodthirsty Boba of the present, but we can understand making an exception to one's moral code when it comes to seeking justice (even if it's frontier justice) on the raiders who killed your found family of Sand People.
Let the Past Die, Kill it if You Have To
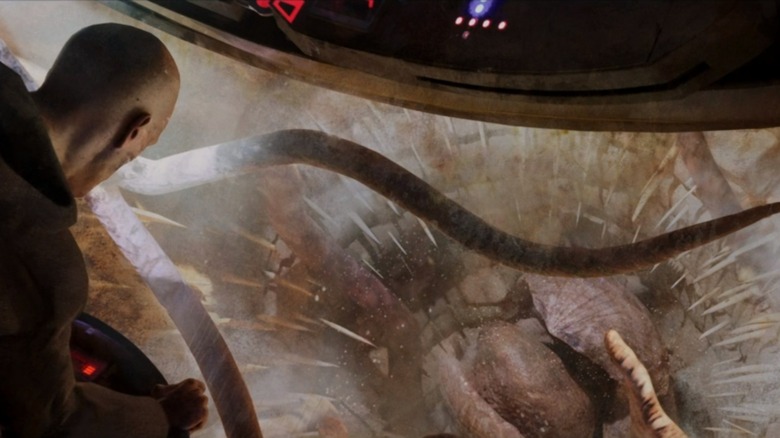
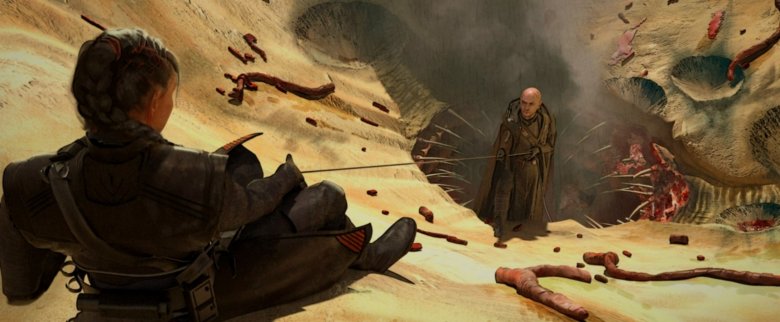
You didn't think "Star Wars" was just going to stop taking inspiration from "Dune," did you? This next sequence features Boba Fett returning to the location of his infamous demise, though he's come prepared with a few more toys of his own this time around. This artwork recalls a very similar shot composition from Denis Villeneuve's "Dune," with the fearsome sand worms of Arrakis standing in for the menacing Sarlacc of Tatooine. Of course, it's only natural that Boba would feel compelled to settle a score with the monster that took everything from him back in "Return of the Jedi." The trouble is, Boba mistakenly assumes his armor is still inside the creature's abode and he risks his newly recovered ship to get it back.
 Lucasfilm
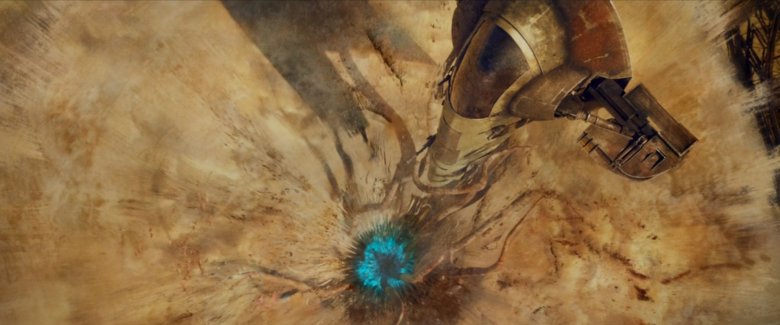
Thank the Maker for a seismic charge and a quick-thinking Fennec Shand. Just when it appears that the Sarlacc will swallow up the gunship and, in the process, finish off Boba Fett for good, fans get a fun throwback to one of the most memorable instances of sound design in the entire franchise. First seen in "Attack of the Clones," the seismic charge detonation narrowly allows Boba and Fennec to escape the clutches of the Sarlacc, seemingly putting down the monster for good.
 Lucasfilm
Still no armor, though. Possibly standing on the exact spot that Han Solo once rescued a helpless Lando Calrissian, Fennec reels in an empty-handed Boba Fett back from the depths of the pit. Honestly, it's kind of amusing to see how much Boba talks around the fact that he ended up in the pit in the first place because he was kind of a klutz and the furthest thing from the capable, proficient badass he is in "The Mandalorian" and "The Book of Boba Fett." The creative choice is probably explained away by Favreau & Co. not really wanting to remind audiences of that pesky little detail, but I'd like to think Boba is just embarrassed about his failure and would rather pretend that it never happened that way at all. After all, who could blame him?
 Lucasfilm
 Lucasfilm
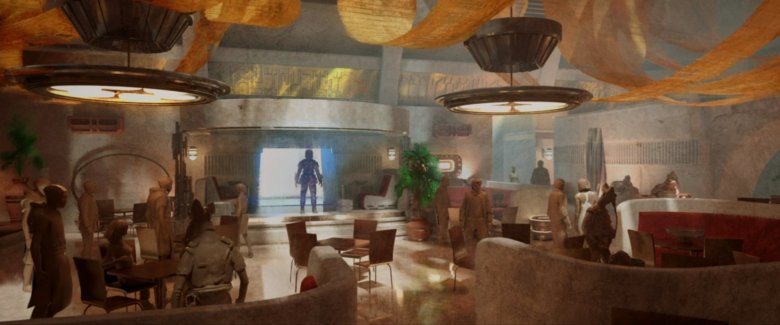
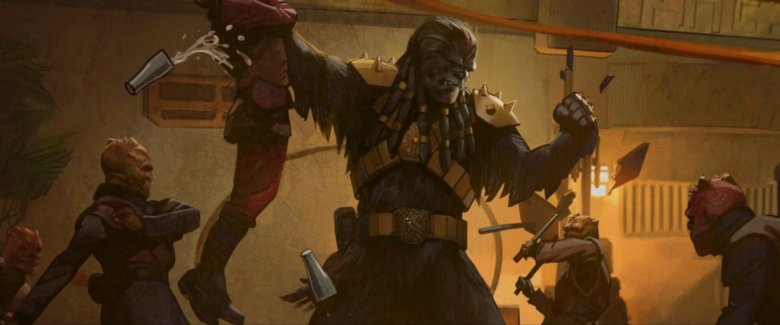
Back in the present, Boba makes his rounds and arrives at Garsa Fwip's (Jennifer Beals) Sanctuary, where Black Krrsantan is terrorizing some patrons. This time, Boba actively recruits the Wookiee, giving him yet another formidable ally in the war to come.